BookStack Deployment - Full Book
This page is a dynamically generated collection of other pages in this book. If you want to focus on one topic at a time, you will see them in the Book Navigation menu to the left (below the Page Navigation tree). Attached files for any given section can be found on the page for that particular section. You will not find them attached here.
Installation
Many of the commands and edits in this guide need to be performed as root. Use sudo where indicated or log in as root.
Installation is very easy. Just run the script provided by the developer. The installation script will ask you to enter either a name or an IP address. This value will be added to the web server config and the BookStack .env file. If you specify a name that your computer can't resolve, you will be unable to use BookStack until you manually correct the discrepancies.
This installation script is intended to be run on a vanilla OS installation without any existing sites and/or web applications. If you already have a network service running on this server, you run the risk of breaking those services by running the script.
Ubuntu 22.04 Installation Script
installation-ubuntu-22.04.sh (click to expand)
#!/bin/bash

echo "This script installs a new BookStack instance on a fresh Ubuntu 22.04 server."
echo "This script does not ensure system security."
echo ""

# Generate a path for a log file to output into for debugging
LOGPATH=$(realpath "bookstack_install_$(date +%s).log")

# Get the current user running the script
SCRIPT_USER="${SUDO_USER:-$USER}"

# Get the current machine IP address
CURRENT_IP=$(ip addr | grep 'state UP' -A4 | grep 'inet ' | awk '{print $2}' | cut -f1  -d'/')

# Generate a password for the database
DB_PASS="$(head /dev/urandom | tr -dc A-Za-z0-9 | head -c 13)"

# The directory to install BookStack into
BOOKSTACK_DIR="/var/www/bookstack"

# Get the domain from the arguments (Requested later if not set)
DOMAIN=$1

# Prevent interactive prompts in applications
export DEBIAN_FRONTEND=noninteractive

# Echo out an error message to the command line and exit the program
# Also logs the message to the log file
function error_out() {
  echo "ERROR: $1" | tee -a "$LOGPATH" 1>&2
  exit 1
}

# Echo out an information message to both the command line and log file
function info_msg() {
  echo "$1" | tee -a "$LOGPATH"
}

# Run some checks before installation to help prevent messing up an existing
# web-server setup.
function run_pre_install_checks() {
  # Check we're running as root and exit if not
  if [[ $EUID -gt 0 ]]
  then
    error_out "This script must be ran with root/sudo privileges"
  fi

  # Check if Apache appears to be installed and exit if so
  if [ -d "/etc/apache2/sites-enabled" ]
  then
    error_out "This script is intended for a fresh server install, existing apache config found, aborting install"
  fi

  # Check if MySQL appears to be installed and exit if so
  if [ -d "/var/lib/mysql" ]
  then
    error_out "This script is intended for a fresh server install, existing MySQL data found, aborting install"
  fi
}

# Fetch domain to use from first provided parameter,
# Otherwise request the user to input their domain
function run_prompt_for_domain_if_required() {
  if [ -z "$DOMAIN" ]
  then
    info_msg ""
    info_msg "Enter the domain (or IP if not using a domain) you want to host BookStack on and press [ENTER]."
    info_msg "Examples: my-site.com or docs.my-site.com or ${CURRENT_IP}"
    read -r DOMAIN
  fi

  # Error out if no domain was provided
  if [ -z "$DOMAIN" ]
  then
    error_out "A domain must be provided to run this script"
  fi
}

# Install core system packages
function run_package_installs() {
  apt update
  apt install -y git unzip apache2 php8.1 curl php8.1-curl php8.1-mbstring php8.1-ldap \
  php8.1-xml php8.1-zip php8.1-gd php8.1-mysql mysql-server-8.0 libapache2-mod-php8.1
}

# Set up database
function run_database_setup() {
  mysql -u root --execute="CREATE DATABASE bookstack;"
  mysql -u root --execute="CREATE USER 'bookstack'@'localhost' IDENTIFIED WITH mysql_native_password BY '$DB_PASS';"
  mysql -u root --execute="GRANT ALL ON bookstack.* TO 'bookstack'@'localhost';FLUSH PRIVILEGES;"
}

# Download BookStack
function run_bookstack_download() {
  cd /var/www || exit
  git clone https://github.com/BookStackApp/BookStack.git --branch release --single-branch bookstack
}

# Install composer
function run_install_composer() {
  EXPECTED_CHECKSUM="$(php -r 'copy("https://composer.github.io/installer.sig", "php://stdout");')"
  php -r "copy('https://getcomposer.org/installer', 'composer-setup.php');"
  ACTUAL_CHECKSUM="$(php -r "echo hash_file('sha384', 'composer-setup.php');")"

  if [ "$EXPECTED_CHECKSUM" != "$ACTUAL_CHECKSUM" ]
  then
      >&2 echo 'ERROR: Invalid composer installer checksum'
      rm composer-setup.php
      exit 1
  fi

  php composer-setup.php --quiet
  rm composer-setup.php

  # Move composer to global installation
  mv composer.phar /usr/local/bin/composer
}

# Install BookStack composer dependencies
function run_install_bookstack_composer_deps() {
  cd "$BOOKSTACK_DIR" || exit
  export COMPOSER_ALLOW_SUPERUSER=1
  php /usr/local/bin/composer install --no-dev --no-plugins
}

# Copy and update BookStack environment variables
function run_update_bookstack_env() {
  cd "$BOOKSTACK_DIR" || exit
  cp .env.example .env
  sed -i.bak "s@APP_URL=.*\$@APP_URL=http://$DOMAIN@" .env
  sed -i.bak 's/DB_DATABASE=.*$/DB_DATABASE=bookstack/' .env
  sed -i.bak 's/DB_USERNAME=.*$/DB_USERNAME=bookstack/' .env
  sed -i.bak "s/DB_PASSWORD=.*\$/DB_PASSWORD=$DB_PASS/" .env
  # Generate the application key
  php artisan key:generate --no-interaction --force
}

# Run the BookStack database migrations for the first time
function run_bookstack_database_migrations() {
  cd "$BOOKSTACK_DIR" || exit
  php artisan migrate --no-interaction --force
}

# Set file and folder permissions
# Sets current user as owner user and www-data as owner group then
# provides group write access only to required directories.
# Hides the `.env` file so it's not visible to other users on the system.
function run_set_application_file_permissions() {
  cd "$BOOKSTACK_DIR" || exit
  chown -R "$SCRIPT_USER":www-data ./
  chmod -R 755 ./
  chmod -R 775 bootstrap/cache public/uploads storage
  chmod 740 .env

  # Tell git to ignore permission changes
  git config core.fileMode false
}

# Setup apache with the needed modules and config
function run_configure_apache() {
  # Enable required apache modules
  a2enmod rewrite
  a2enmod php8.1

  # Set-up the required BookStack apache config
  cat >/etc/apache2/sites-available/bookstack.conf <<EOL
<VirtualHost *:80>
  ServerName ${DOMAIN}

  ServerAdmin webmaster@localhost
  DocumentRoot /var/www/bookstack/public/

  <Directory /var/www/bookstack/public/>
      Options -Indexes +FollowSymLinks
      AllowOverride None
      Require all granted
      <IfModule mod_rewrite.c>
          <IfModule mod_negotiation.c>
              Options -MultiViews -Indexes
          </IfModule>

          RewriteEngine On

          # Handle Authorization Header
          RewriteCond %{HTTP:Authorization} .
          RewriteRule .* - [E=HTTP_AUTHORIZATION:%{HTTP:Authorization}]

          # Redirect Trailing Slashes If Not A Folder...
          RewriteCond %{REQUEST_FILENAME} !-d
          RewriteCond %{REQUEST_URI} (.+)/$
          RewriteRule ^ %1 [L,R=301]

          # Handle Front Controller...
          RewriteCond %{REQUEST_FILENAME} !-d
          RewriteCond %{REQUEST_FILENAME} !-f
          RewriteRule ^ index.php [L]
      </IfModule>
  </Directory>

  ErrorLog \${APACHE_LOG_DIR}/error.log
  CustomLog \${APACHE_LOG_DIR}/access.log combined

</VirtualHost>
EOL

  # Disable the default apache site and enable BookStack
  a2dissite 000-default.conf
  a2ensite bookstack.conf

  # Restart apache to load new config
  systemctl restart apache2
}

info_msg "This script logs full output to $LOGPATH which may help upon issues."
sleep 1

run_pre_install_checks
run_prompt_for_domain_if_required
info_msg ""
info_msg "Installing using the domain or IP \"$DOMAIN\""
info_msg ""
sleep 1

info_msg "[1/9] Installing required system packages... (This may take several minutes)"
run_package_installs >> "$LOGPATH" 2>&1

info_msg "[2/9] Preparing MySQL database..."
run_database_setup >> "$LOGPATH" 2>&1

info_msg "[3/9] Downloading BookStack to ${BOOKSTACK_DIR}..."
run_bookstack_download >> "$LOGPATH" 2>&1

info_msg "[4/9] Installing Composer (PHP dependency manager)..."
run_install_composer >> "$LOGPATH" 2>&1

info_msg "[5/9] Installing PHP dependencies using composer..."
run_install_bookstack_composer_deps >> "$LOGPATH" 2>&1

info_msg "[6/9] Creating and populating BookStack .env file..."
run_update_bookstack_env >> "$LOGPATH" 2>&1

info_msg "[7/9] Running initial BookStack database migrations..."
run_bookstack_database_migrations >> "$LOGPATH" 2>&1

info_msg "[8/9] Setting BookStack file & folder permissions..."
run_set_application_file_permissions >> "$LOGPATH" 2>&1

info_msg "[9/9] Configuring apache server..."
run_configure_apache >> "$LOGPATH" 2>&1

info_msg "----------------------------------------------------------------"
info_msg "Setup finished, your BookStack instance should now be installed!"
info_msg "- Default login email: [email protected]"
info_msg "- Default login password: password"
info_msg "- Access URL: http://$CURRENT_IP/ or http://$DOMAIN/"
info_msg "- BookStack install path: $BOOKSTACK_DIR"
info_msg "- Install script log: $LOGPATH"
info_msg "---------------------------------------------------------------"
Copy the above script into a text file on the server, make it executable, and run it. In the example below, I copied the script into a file called bookstack-install.sh.
sudo chmod +x bookstack-install.sh
sudo ./bookstack-install.sh
Initial Configuration
Many of the commands and edits in this guide need to be performed as root. Use sudo where indicated or log in as root.
The base installation is relatively insecure and needs some attention. Not included on this page is that the default admin user credentials need to be changed. We will address this problem in the next section by using Active Directory (AD) for authentication. If you do not intend to use AD or another LDAP service, you can find instructions on how to change the default credentials in the official BookStack documentation.
Apache
Summary
Before we get to making changes to the BookStack web application, we need to shore up the Apache web server configuration by doing the following:
- Set a global server name (optional)
- Enable SSL module
- Install web certificate and private key issued by a valid certificate authority
- Configure virtual host for HTTPS
- Enable OCSP stapling to improve security and SSL/TLS handshake performance (optional)
Set Global Server Name
This step isn't absolutely necessary, but it does suppress an annoying Apache error and (according to Digital Ocean and other sites) it increases compatibility and stability.
Set a global server name in /etc/apache2/apache2.conf by adding the following lines to the bottom of the file.
# Set global server name to suppress AH00558 error message
ServerName 127.0.0.1
SSL/TLS
Enable SSL Module
Enable the Apache SSL module.
sudo a2enmod sslInstall Web Certificates
The BookStack developer has a youtube video for using certbot to automatically obtain and install a Let's Encrypt certificate and key, but we're going to assume you have a local certificate authority that you want to use instead. It is also assumed that your web server certificate includes the chain of trust up to (but not necessarily including) the root certificate authority (CA).
Copy the issued certificate and private key to the server (I usually drop things in /tmp/ first) and install them to /etc/ssl/certs/ and /etc/ssl/private/ respectively
sudo mv /tmp/wiki-web-cert.pem /etc/ssl/certs/
sudo mv /tmp/wiki-web-key.pem /etc/ssl/private/
Change the owning user and group for the private key to root and www-data respectively, then restrict file permissions to read/write for root and read for www-data.
sudo chown root:www-data /etc/ssl/private/wiki-web-key.pem
sudo chmod 640 /etc/ssl/private/wiki-web-key.pem
Changing file permissions for the private key isn't necessary to get the web server to function, but it is best practice to limit private key exposure.
Virtual Host Configuration
Replace the contents of /etc/apache2/sites-available/bookstack.conf with the modified configuration below. There are comments in the modified configuration indicating which values you will need to change to match your environment.
bookstack.conf (click to expand)
## BookStack is wiki software. It is simple and easy to install and configure

# Virtual host listening on port 80 to handle HTTP to HTTPS redirects
<VirtualHost *:80>
  # Update this to match the FQDN for your server
  ServerName wiki.example.com
  # Update this to match the short name for your server
  ServerAlias wiki
  # Update this to match the FQDN for your server
  Redirect / https://wiki.example.com
</VirtualHost>

# Virtual host listening on port 443
# This is the main site
<VirtualHost *:443>
  # Update this to match the FQDN for your server
  ServerName wiki.example.com
  # Update this to match the short name for your server
  ServerAlias wiki

  ServerAdmin webmaster@localhost
  DocumentRoot /var/www/bookstack/public/

  # Enables SSL and points to the installed key and certificate
  SSLEngine on
  # Update this to match the path to the server web certificate
  SSLCertificateFile /etc/ssl/certs/wiki-web-cert.pem
  # Update this to match the path to the server web private key
  SSLCertificateKeyFile /etc/ssl/private/wiki-web-key.pem

  # Defines the BookStack web application directory
  <Directory /var/www/bookstack/public/>
      Options -Indexes +FollowSymLinks
      AllowOverride None
      Require all granted
      <IfModule mod_rewrite.c>
          <IfModule mod_negotiation.c>
              Options -MultiViews -Indexes
          </IfModule>

          RewriteEngine On

          # Handle Authorization Header
          RewriteCond %{HTTP:Authorization} .
          RewriteRule .* - [E=HTTP_AUTHORIZATION:%{HTTP:Authorization}]

          # Redirect Trailing Slashes If Not A Folder...
          RewriteCond %{REQUEST_FILENAME} !-d
          RewriteCond %{REQUEST_URI} (.+)/$
          RewriteRule ^ %1 [L,R=301]

          # Handle Front Controller...
          RewriteCond %{REQUEST_FILENAME} !-d
          RewriteCond %{REQUEST_FILENAME} !-f
          RewriteRule ^ index.php [L]
      </IfModule>
  </Directory>

  ErrorLog ${APACHE_LOG_DIR}/error.log
  CustomLog ${APACHE_LOG_DIR}/access.log combined

</VirtualHost>
The new configuration accomplishes a few important things:
- Moves the site from port 80 (HTTP) to port 443 (HTTPS)
- Adds a second virtual host that still listens on port 80 so that it can redirect traffic to the HTTPS site
- Adds a server alias so that the short DNS name, wiki, can be used in addition to the full 'wiki.example.com'
- Enables the SSL engine to handle encryption
- Adds pointers to the web certificate and key that you installed
Enable OCSP Stapling
If you do not have an OCSP responder configured and/or reachable, you will not be able to use OCSP stapling and can skip this step.
Add the OCSP Stapling Directive section to /etc/apache2/mods-available/ssl.conf beneath the SSLSessionCache directive section. The SSLStaplingCache folder should match the SSLSessionCache folder. In this case, it's shmcb:${APACHE_RUN_DIR}/, but that may vary depending on your Linux distribution.
Both the exiting SSLSessionCache section and new OCSP stapling section are shown below for reference.
        #   Inter-Process Session Cache:
        #   Configure the SSL Session Cache: First the mechanism
        #   to use and second the expiring timeout (in seconds).
        #   (The mechanism dbm has known memory leaks and should not be used).
        #SSLSessionCache                 dbm:${APACHE_RUN_DIR}/ssl_scache
        SSLSessionCache         shmcb:${APACHE_RUN_DIR}/ssl_scache(512000)
        SSLSessionCacheTimeout  300

        #   OCSP Stapling Directives
        SSLUseStapling On
        SSLStaplingCache shmcb:${APACHE_RUN_DIR}/ssl_stapling(32768)
Restart the apache2 service
sudo systemctl restart apache2.serviceThen confirm that OCSP stapling is working by running the below command, replacing wiki.example.com with the FQDN for your server. You'll know it is working if you get a successful response from the OCSP responder (see example output in the image below).
openssl s_client -connect bookstack.example.com:443 -status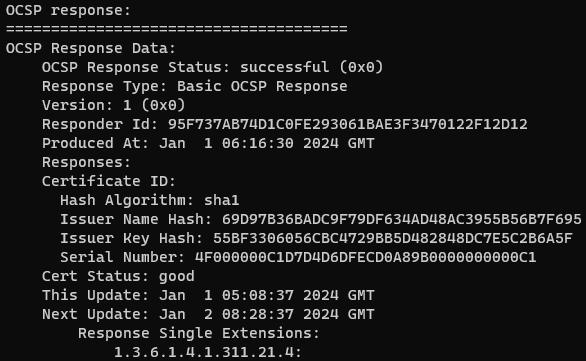
BookStack Web App
Summary
Now that we're done modifying the Apache web server configuration, we can start hardening the BookStack web application.
- Configure application to use HTTPS
- Secure uploaded files
- Set up logging for failed login attempts
- Restrict file permissions on application files
Security Best Practices
Using HTTPS
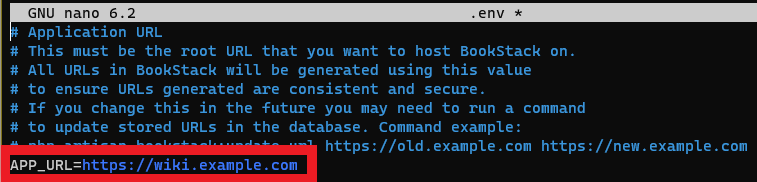
Locate the APP_URL value toward the top of /var/www/bookstack/.env and point it to HTTPS instead of HTTP.
Take a snapshot/backup of the server or back up the BookStack database before performing the next step because it can break things if entered incorrectly
If you have already added images and attachments to your BookStack instance, you will need to run the following command to correct any content paths that are still pointing to HTTP instead of HTTPS. You will be prompted to confirm the operation twice before it is executed.
sudo php artisan bookstack:update-url http://wiki.example.com https://wiki.example.comSecuring Uploaded Files
BookStack makes all uploaded images public by default, so anyone with the correct URL can view a given image. To restrict images to users who are logged in and have permission to view them, add the following to the bottom of the .env file.
# Image and Attachment Storage Type
STORAGE_TYPE=local_secure_restricted
To apply the change to any existing images, you need to move them from the public folder to the more secure folder in /var/www/bookstack/storage/
sudo mv /var/www/bookstack/public/uploads/images/* /var/www/bookstack/storage/uploads/images/Logging Failed Login Attempts
Add the following to .env to enable logging for failed login attempts:
# Enable logging for failed login attempts
LOG_FAILED_LOGIN_MESSAGE="Failed login for %u"
Unless you specified an alternative log file somewhere else on the system, failed login attempts will be logged to /var/log/apache2/error.log
File Permissions
The installer script makes your user the owner of everything in /var/www/boockstack/, but this should be changed to root to prevent malicious modification in the event that your user is compromised. You should also make www-data (web server group) the owning group.
sudo chown -R root:www-data /var/www/bookstack/Now we change all kinds of file permissions:
- Give root full permissions (which it technically has anyway) to everything in the BookStack folder
- Give www-data full permissions to /var/www/bookstack/storage, /var/www/bookstack/bootstrap/cache, and /var/www/bookstack/public/uploads
- Restrict permissions to .env to read/write for root and read for www-data
- All users will have read and execute permissions to everything except .env
sudo chmod -R 755 /var/www/bookstack
sudo chmod -R 775 /var/www/bookstack/storage /var/www/bookstack/bootstrap/cache /var/www/bookstack/public/uploads
sudo chmod 640 /var/www/bookstack/.env
It's worth noting that this approach adds execute permissions to a bunch of files that are not executable, but the default installation does this already anyway and it doesn't really hurt anything
Other Requirements
Server Firewall
As is the case with any production server, you should only open ports that the server needs in order to function. All other ports should be closed. Unless you have additional requirements (alternative remote management methods, monitoring, etc), I recommend opening only the following ports:
Inbound Ports
- 22/tcp for SSH access
- 80/tcp (only for redirecting to port 443 for HTTPS)
- 443/tcp for web server access
Outbound Ports
- 80/tcp for OS and package updates
- 53 for DNS resolution (both TCP and UDP)
- 636/tcp for LDAPS (if using Active Directory)
We're going to be using the Uncomplicated Firewall (UFW) frontend to configure rules because it is easy to use and is available on Ubuntu Server out of the box. You can use it on other distributions, but you may need to install it yourself.
Before we configure any specific rules, we should establish an implicit deny rule for outgoing traffic. There is already an implicit deny policy for incoming traffic, so we don't need to add that ourselves.
sudo ufw default deny outgoingNext, we'll set up our allow rules for incoming traffic. Notice that SSH access is restricted to the private IPv4 address range of 192.168.150.0/24. Replace 192.168.150.0/24 with a subnet on your own network. This should be a management subnet to limit opportunities for potential abuse.
sudo ufw allow in from 192.168.150.0/24 to any proto tcp port 22 comment "SSH from Management LAN"
sudo ufw allow in 80,443/tcp comment "Web Ports"
Finally, we'll set rules for outgoing traffic.
sudo ufw allow out 80/tcp comment "OS and Package Updates"
sudo ufw allow out 53 comment "DNS Resolution"
sudo ufw allow out 636/tcp comment "AD Auth"
UFW will continue to allow DHCP traffic and ICMP echo requests because of rulesets defined in /etc/ufw/. If you want to block either or both of these, you will need to update the rulesets.
Active Directory/LDAP Integration
Many of the commands and edits in this guide need to be performed as root. Use sudo where indicated or log in as root.
This section will assume the following:
- BookStack is being deployed in an environment with Active Directory (AD)
- There is an internal/local certificate authority (CA) which is handing out certificates to domain controllers (DCs)
- You are currently logged in to BookStack with the default admin account
- If there is a network firewall between BookStack and your DCs, you have configured it to allow LDAPS traffic (port 636/tcp) to pass
You will also need to add a service account user in AD for BookStack to use for LDAP queries. The default Domain Users group provides sufficient permissions/privileges for BookStack.
Install CA Certificate
For LDAPS to work, the BookStack server needs to trust the certificate from the DC. This is accomplished by installing the CA certificate to the server's trust store. If you do not do this, the SSL/TLS handshake with the DC will fail and BookStack will not be able to successfully run LDAP queries to authenticate users.
Copy the root CA certificate to the BookStack server and move it to /usr/local/share/ca-certificates/.
sudo mv /tmp/Root-CA.crt /usr/local/share/ca-certificates/Then add the CA certificate to the trust store by running update-ca-certificates. This will add a symlink to the certificate file in /etc/ssl/certs/ and append the contents of the certificate to /etc/ssl/certs/ca-certificates.crt.
sudo update-ca-certificatesYou can copy and install an intermediate CA certificate as well, but it is not necessary as long as the DC's certificate includes the chain of trust leading up to the root CA.
Edit .env File
LDAP Authentication Options
Append the following example section to the bottom of your .env file in /var/www/bookstack/ and update necessary values to match your environment. The example assumes the following:
- There is a BookStack service account named bookstack in the default AD Users container
- There is a BookStack Users group in the default AD Users container
Active Directory Configuration Options (click to expand)
#### Active Directory Integration ####
# Set authentication method to ldap
AUTH_METHOD=ldap

# Point to a domain controller for LDAP queries
# You can just point to the domain if you have multiple domain controllers. BookStack will query whichever server is resolved by DNS
# Note that if a domain controller goes down, DNS will still resolve to it some of the time, so this is not a perfect failover solution
# You might be able to configure an LDAP proxy using OpenLDAP to get around the above issue
# Make sure you are using LDAPS so that this traffic is encrypted
LDAP_SERVER=ldaps://example.com

# This is the path that BookStack will use to check for users
# If you have BookStack users in different OUs/containers in Active Directory, you can just specify the distinguished name of the domain
LDAP_BASE_DN="dc=example,dc=com"

# Distinguished name and password for the BookStack service account performing LDAP queries
LDAP_DN="cn=bookstack,cn=Users,dc=example,dc=com"
LDAP_PASS="ServiceAccountPassword"

# A filter to use when searching for users
# '${user}' resolves to the username being used at the login page
# If you're setting this option via other means, such as within a docker-compose.yml,
# you may need escape the $, often using $$ or \$ instead.
# Note: This option cannot be used with the docker-compose.yml `env_file` option.
LDAP_USER_FILTER="(&(sAMAccountName=${user})(memberOf:1.2.840.113556.1.4.1941:=cn=BookStack Users,cn=Users,dc=example,dc=com))"

# Server LDAP version
LDAP_VERSION=3

# Set the property to use as a unique identifier for users.
# Stored and used to match LDAP users with existing BookStack users.
# Prefixing the value with 'BIN;' will assume the LDAP service provides the attribute value as binary data and BookStack will convert the value to a hexidecimal representation.
LDAP_ID_ATTRIBUTE=BIN;objectGUID

# LDAP attribute from which to pull an email address
LDAP_EMAIL_ATTRIBUTE=mail

# Set the property to use for a user's display name. Defaults to 'cn'
LDAP_DISPLAY_NAME_ATTRIBUTE=cn

# Don't use StartTLS because LDAPS should handle encryption
LDAP_START_TLS=false

# This can be set to true if the BookStack server doesn't trust the LDAP server
# It is always best to install necessary certificates to ensure that both parties on either side of a conversation are trusted before moving any service into production
LDAP_TLS_INSECURE=false

# If you need to debug the details coming from your LDAP server, uncomment this option
# Only set this option if debugging since it will block logins and potentially show private details.
#LDAP_DUMP_USER_DETAILS=true

# Enable LDAP group sync, Set to 'true' to enable.
# This feature matches BookStack roles with LDAP groups
LDAP_USER_TO_GROUPS=true

# LDAP user attribute containing groups, Defaults to 'memberOf'.
LDAP_GROUP_ATTRIBUTE="memberOf"

# Remove users from roles that don't match LDAP groups.
# Note: While this is enabled the "Default Registration Role", editable within the
# BookStack settings view, will be considered a matched role and assigned to the user.
LDAP_REMOVE_FROM_GROUPS=true

# If you need to debug the group details coming from your LDAP server, uncomment this option
# Only set this option if debugging since it will block logins and potentially show private details.
#LDAP_DUMP_USER_GROUPS=true
Read through the added options carefully. As you can see, there are plenty of comments to help describe what each option does. With that said, it is probably a good idea to break down what is happening with the LDAP_USER_FILTER value. This filter does a few things:
- (sAMAccountName=${user}) queries AD for the username being used by the person who is trying to log in
- (memberOf=cn=BookStack Users,cn=Users,dc=example,dc=com) checks if the user is in the BookStack Users group.
- :1.2.840.113556.1.4.1941: is added to the memberOf condition to check any nested groups. This is useful for when you sync BookStack roles to AD groups because you can store multiple roles within a single BookStack Users group. Here are some examples of how you might use this:
- BookStack Users group can log in to BookStack
- BookStack Users/BookStack Admins group can log in and has admin privileges
- BookStack Users/BookStack Editors group can log in and has editing privileges
Alternatively, you could add an OR statement to the filter and explicitly name each group with something like (|(group_one_DN)(group_two_DN)(group_three_DN)), but it is not as clean and would need to be extended every time a new role was added to BookStack.
It is worth noting that users will still be able to log in and groups will still sync without the additional filtering. However, it will allow all users in the base DN to authenticate to the server regardless of whether or not they are in one of the configured groups. This is not the most secure configuration.
Save your changes to .env, but do not log out of the default admin user yet. Your AD user account won't be able to modify BookStack settings until you map an admin BookStack role to an AD group that your user is in. If you need to log out temporarily to test whether LDAP authentication works at all, you can log back in to the default account later by commenting out the AUTH_METHOD option in .env.
Avatar Fetching
You can use the LDAP_THUMBNAIL_ATTRIBUTE option to pull user avatars from AD. To do this reliably, you should also disable automatic avatar fetching from external sources. The default service used for this is called Gravatar and can be disabled by adding the AVATAR_URL option and setting it to false. Add the following to .env
# Use custom avatar service, Sets fetch URL
# Possible placeholders: ${hash} ${size} ${email}
# If set, Avatars will be fetched regardless of DISABLE_EXTERNAL_SERVICES option.
# Example: AVATAR_URL=https://seccdn.libravatar.org/avatar/${hash}?s=${size}&d=identicon
AVATAR_URL=false

# Set the attribute to use for the user's avatar image.
# Must provide JPEG binary image data.
# Will be used upon login or registration when the user doesn't
# already have an avatar image set.
# Remove this option or set to 'null' to disable LDAP avatar import.
LDAP_THUMBNAIL_ATTRIBUTE=thumbnailPhoto
You can disable all default third-party services by setting the DISABLE_EXTERNAL_SERVICES option to true. Gravatar and draw.io/diagrams.net are the only default third-party services which are identified in the BookStack documentation, but it is possible that other services may be affected as well.
Role and Group Configuration
Create two groups in AD, BookStack Users and BookStack Admins, with the BookStack Admins group being nested inside the BookStack Users group (nesting allows us to take full advantage of the LDAP filter we defined in .env). Once you have created the groups, assign the account you wish to use for BookStack administration to the BookStack Admins group.
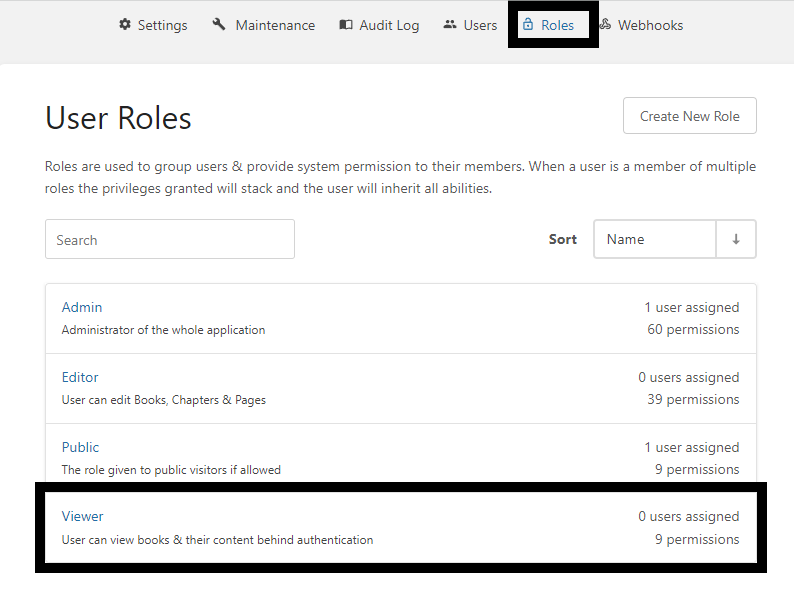
In BookStack, go to Settings/Roles and select the Viewer role. We'll be editing this role to match the BookStack Users group in AD. If the permissions applied to this role do not match your needs exactly, you can go back and edit them later.
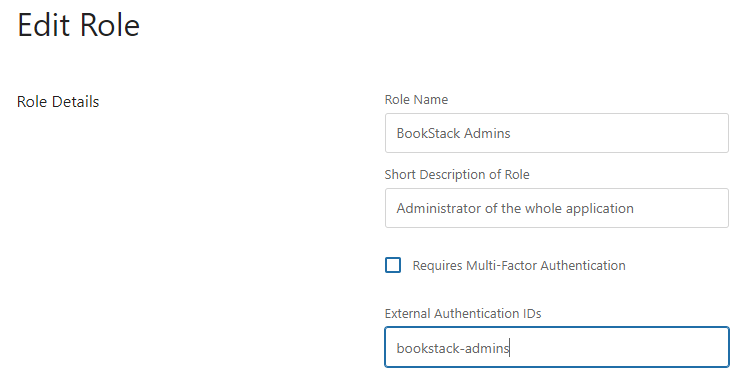
Edit the Role Name and External Authentication IDs fields as shown below. BookStack uses the External Authentication IDs field to match BookStack roles to AD groups. You must replace any spaces in the Role Name with a dash/hyphen in the External Authentication IDs field. When you are finished, click the Save Role button at the bottom of the page.
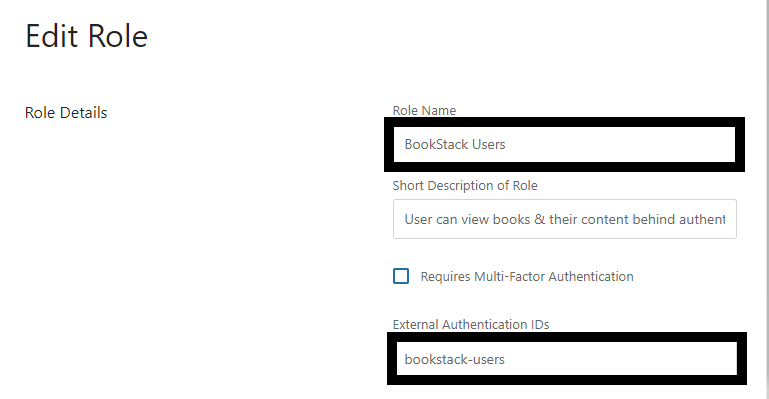

Ideally, the role name should match the group name, but you can really put whatever you want in the Role Name field as long as the External Authentication IDs field can find a match.
Go back to Settings/Roles, select the Admin role, edit the role to match the BookStack Admins group in AD, then save your changes. Once you complete this step, you will be able to log in and make settings changes with the AD user you added to the BookStack Admins group.
Cleanup
After confirming that your AD account can log in and has access to BookStack settings, it is a good idea to remove the default admin user in order to prevent potential abuse (example: attacker somehow manages to revert back to local authentication to use the default account credentials). At the very least, you should change the account password to something much more secure.
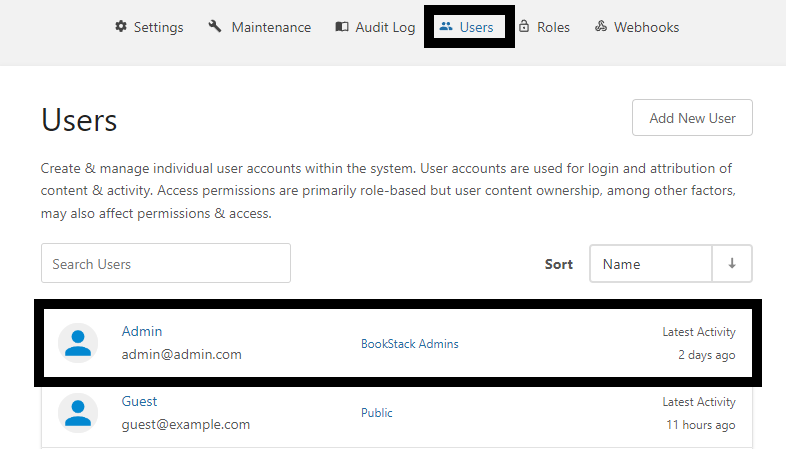
Go to Settings/Users and select the Admin user.
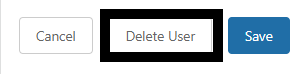
You will find the Delete User button toward the bottom of the Edit User page.
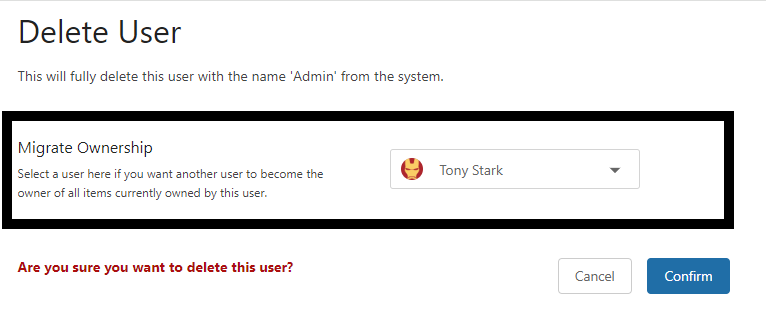
When given the option to migrate ownership of the Admin user's items, select your AD user's account from the dropdown menu, then click Confirm.
Repeat these steps for any other users and/or roles that you do not intend to use.
Misc Tweaks
Many of the commands and edits in this guide need to be performed as root. Use sudo where indicated or log in as root.
.env Edits
Dark Mode
To enable dark mode by default, add the APP_DEFAULT_DARK_MODE option to the .env file and set it to true
# Use dark mode by default
# Will be overriden by any user/session preference.
APP_DEFAULT_DARK_MODE=true
Default Book, Bookshelf, and Bookshelves View
Set a default format for viewing books and bookshelves. The defaults are set out of the box as follows:
- Books: grid view (vendor documentation says it is supposed to be list view, but it isn't as of version 23.12.2)
- Bookshelf: grid
- Bookshelves: grid
The default behavior can be set explicitly by changing the relevant values in /var/www/bookstack/.env to either list or grid. The following example sets them all to list view.
# Show list views by default
# Books view is of all available books
# Bookshelf view is of all available books in a given bookshelf
# Bookshelves view is of all available bookshelves
APP_VIEWS_BOOKS=list
APP_VIEWS_BOOKSHELVES=list
APP_VIEWS_BOOKSHELF=list
# Show list views by default
# Books view is of all available books
# Bookshelf view is of all available books in a given bookshelf
# Bookshelves view is of all available bookshelves
APP_VIEWS_BOOKS=list
APP_VIEWS_BOOKSHELVES=list
APP_VIEWS_BOOKSHELF=listTips and Tricks
Using the WYSIWYG Text Editor
Adding and Using Images in Documents
Manipulating pasted/attached images is not particularly intuitive and takes some getting used to. I'll add some details to this at some point... maybe.
Misc
Reset User Avatar
Resetting an avatar is helpful in cases where you want an avatar to be pulled from a different source than it was originally. For example, you may have a user with an avatar picture from Gravatar but want it to pull from Active Directory instead.
Go to Settings/Users and select the user for whom you want to reset the avatar, then click the reset button in the User Avatar section. The avatar will be refreshed the next time the user logs in

No comments to display
No comments to display