Group Policy
Group Policy
I'm not going to cover all the various ways to lock these accounts and computers down, but they should be restricted as much as possible without crippling them and making them useless.
Objectives
Before we configure anything, let's review what we are trying to achieve with group policy. We want to:
- Configure the Windows registry to enable autologin using one of our autologin user accounts
- Ensure target computers are always available for use
- Ensure password changes do not negatively impact computer availability
To accomplish these goals, we need to configure a new group policy object (GPO). I'll explain settings as we go.
User Configuration
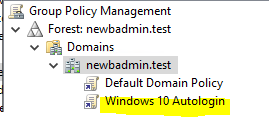
Open up Group Policy Management and create a new GPO called Windows 10 Autologin.

In the new GPO, go to User Configuration\Preferences\Windows Settings\Registry\ and add a new registry value with the following properties:
- Hive: HKEY_LOCAL_MACHINE
- Key Path: SOFTWARE\Microsoft\Windows NT\CurrentVersion\Winlogon\
- Value Name: DefaultUserName
- Value Type: REG_SZ
- Value Data: %USERNAME%
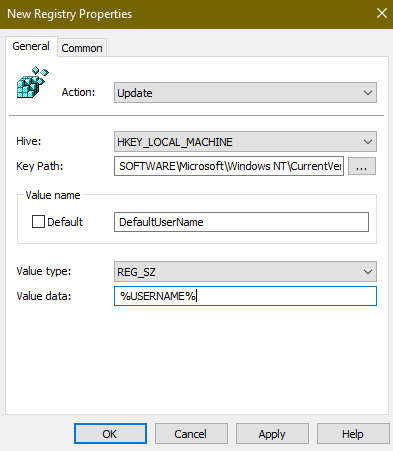
We don't want a new GPO for every autologin account, so we're using the %USERNAME% environment variable to insert the name of the currently logged-in user. This change will take effect after the account logs in for the first time.
Make sure you add this to the User Configuration section of the GPO. If you add it under Computer Configuration, %USERNAME% will resolve to the hostname of the computer instead of the desired account.
Computer Configuration
Autologin
Go to Computer Configuration\Preferences\Windows Settings\Registry\ and add the remaining registry values specified in Configuring Autologin (Single Host). It should look similar to the example image below. Please use a better password in production.

It's worth explaining why the autologin password is in the computer configuration. It makes intuitive sense that it should be in the user configuration, but if you do that, autologin will break the next time you update the password (which you should absolutely do on a regular schedule). With the password in the user configuration, you will invariably end up in a Catch-22 situation in which the user has a new password but can not log in until the user's policy updates, and the policy can't update until the user logs in.
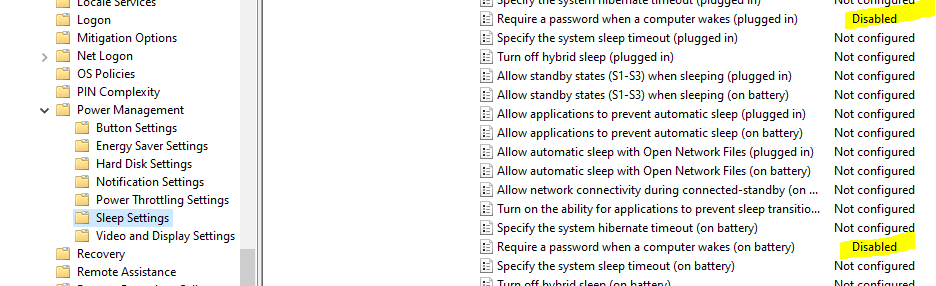
Next, we need to make sure the computer does not time out and lock because that would very quickly defeat the purpose of logging in automatically. Go to Computer Configuration\Policies\Administrative Templates\System\Power Management\Sleep Settings\ and disable Require a password when a computer wakes (plugged in) and Require a password when a computer wakes (on battery).
This is the simplest way to achieve the desired goal but may conflict with your own computer/session locking policies. This setting also applies to all users on this computer. Please consult your own policies before doing this.
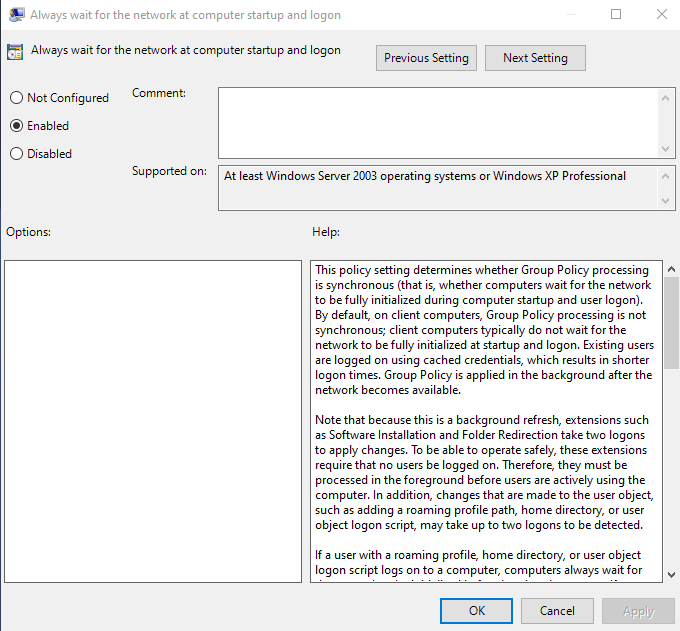
Finally, we need to make sure the computer does not attempt to log in until after it has had a chance to process policies. This will ensure the computer is always aware of the current password configured in the GPO before it logs in. Go to Computer Configuration\Administrative Templates\System\Logon\ and enable Always wait for the network at computer startup and logon.
Remote Management
As you'll see in Password Changes, we're going to need to run some remote commands against our autologin computers. We could do most of this by running Enable-PSRemoting, but that cmdlet doesn't set things up in quite the way I want, so we're doing this the hard way (>' ')>
Windows Remote Management Service (WinRM)
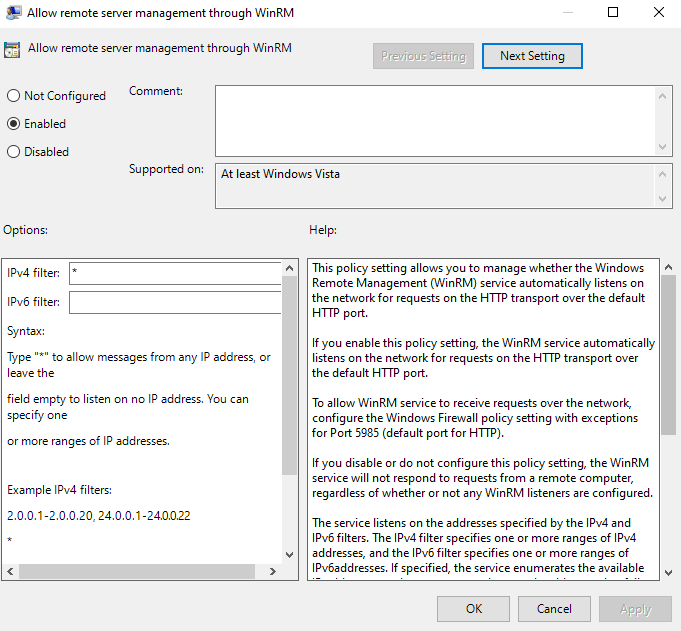
First, we need to allow the WinRM service to listen for network connections. Go to Computer Configuration\Policies\Administrative Templates\Windows Components\Windows Remote Management (WinRM)\WinRM Service\ and enable Allow remote server management through WinRM. Add a * to the IPv4 filter field. This will tell the computer to listen on all available IP addresses.
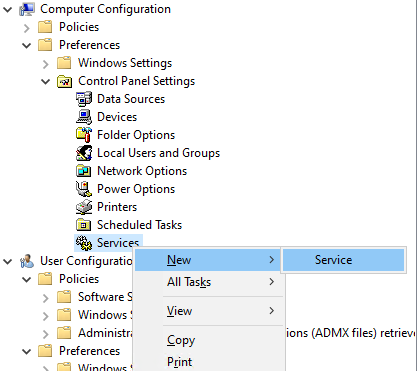
We're going to define a small startup script a little later that depends on the WinRM service. If the WinRM service isn't running, the script won't finish executing and policy processing will hang. We can get around this problem by changing the service startup type from Automatic (Delayed Start) to Automatic. Go to Computer Configuration\Preferences\Control Panel Settings\Services\ and define a new service.
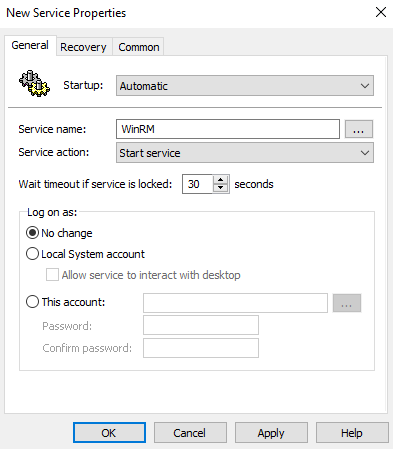
Select the following options:
- Startup: Automatic
- Service Name: WinRM
- Service Action: Start Service
Windows Firewall
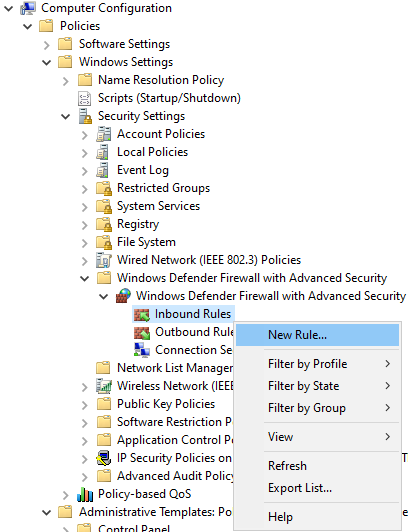
Next, we need to allow remote management traffic through the firewall. Go to Computer Configuration\Policies\Windows Settings\Security Settings\Windows Defender Firewall with Advanced Security\Windows Defender Firewall with Advanced Security\ and create a new inbound rule.
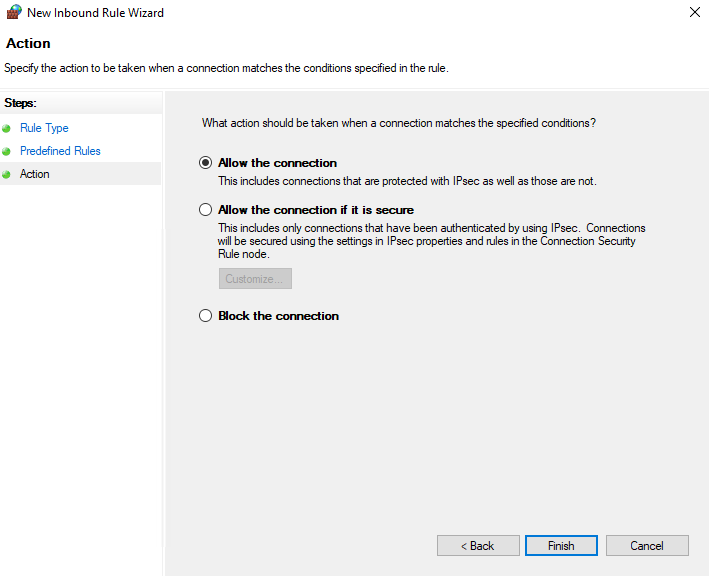
Select the Predefined radio button and select Windows Remote Management from the dropdown menu.
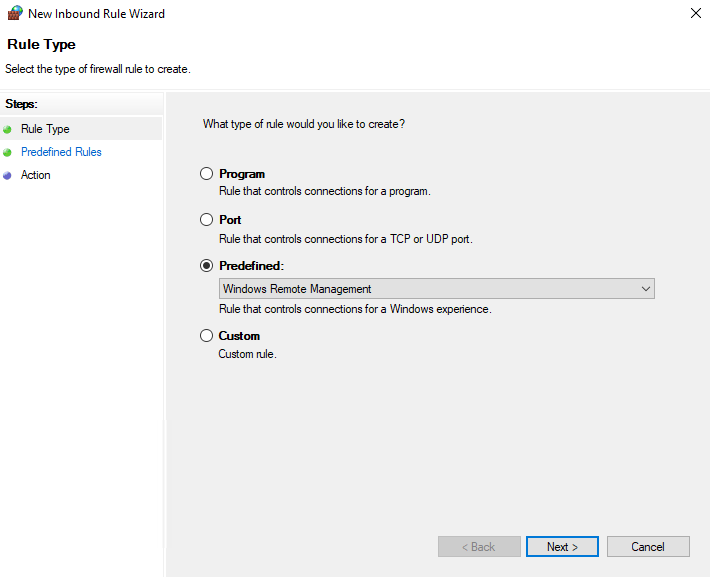
We only want this to be allowed on the domain network, so uncheck the Public rule before continuing.
You may have noticed that the predefined rules are for HTTP and not HTTPS. This does not mean that commands are sent in cleartext. WinRM uses Kerberos authentication in an AD environment and uses message-level encryption for ongoing communication. You can read more about it here: Security Considerations for PowerShell Remoting using WinRM

Select the Allow the connection radio button and click Finish.
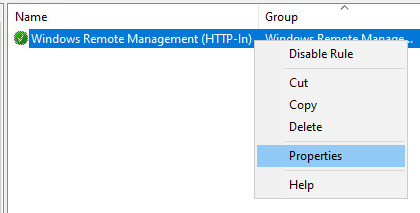
We're not quite finished with the firewall yet. Right-click on the new rule and open the Properties window.
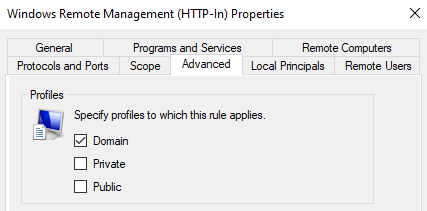
Go to the Advanced tab and uncheck the Private checkbox. This will ensure that only domain network traffic is allowed to pass.
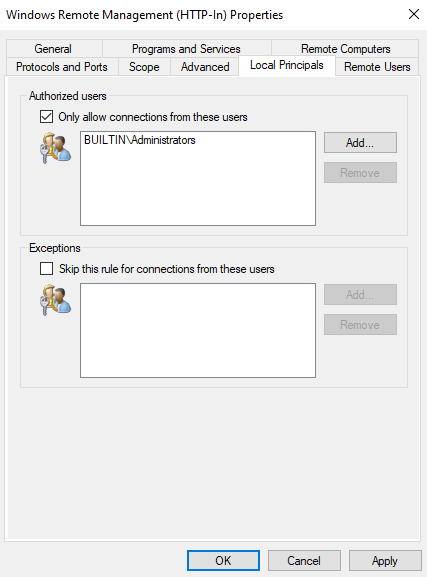
Go to the Local Principals tab, check the Only allow connections from these users box, and add BUILTIN\Administrators. This will restrict the use of this rule to members of the built-in administrators group.
You can do this with other groups, but the additional configuration necessary is out of scope for this topic.
Startup Script
This step isn't necessary for managing Windows Server machines, but Windows 10 adds an extra barrier to remote management by denying remote PowerShell connections by default. To get around this, we need to (somewhat ironically) add a short script to run at startup.
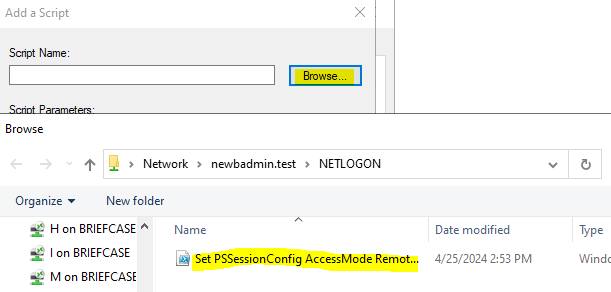
Create a PowerShell script file in your NETLOGON share folder (at \\your-domain.whatever\NETLOGON\) and add the following command to it. We'll call it Set PSSessionConfig AccessMode Remote.ps1 because-well-that's what it does.
# Allows remote use of the Microsoft.Powershell session configuration
Set-PSSessionConfiguration -Name Microsoft.Powershell -AccessMode Remote
Now we need to add our script to the GPO. Go to Computer Configuration\Policies\Windows Settings\Scripts\ and double-click on Startup to open the Startup Properties box. Select the PowerShell Scripts tab and click Add.

Browse to the NETLOGON folder and select the script file we just saved. When you're done, click OK until the Startup Properties box is closed.
Applying Policies
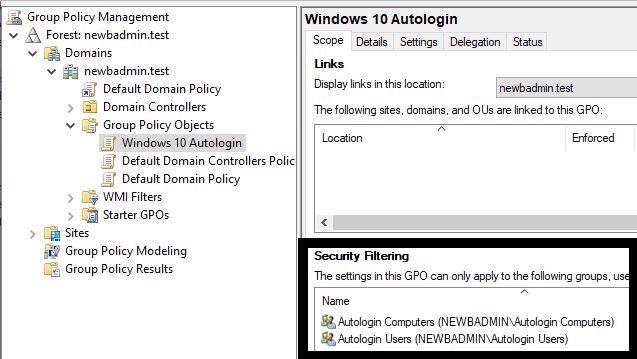
Before we link/enable our new GPO, we need to configure it to filter based on the security groups we added in Creating Users and Computers. Add the Autologin Users and Autologin Computers groups to the Security Filtering section of the GPO.
We also need to remove the Authenticated Users group. This will prevent other users in the linked OU from applying the registry changes.
Only remove the Authenticated Users group from the Security Filtering section. Computers will fail to process the policy if you remove the same group from the Delegation tab.
Now that we have our GPO configured, we can link it to an appropriate OU. For testing purposes, I'm just going to link it to the domain.
If you want the changes to take effect immediately, run a group policy update on the computer(s) using gpupdate /force from an administrator command line window. Run gpresult /r /scope:computerto confirm the new GPO has been applied. If it has not, reboot the computer and check again.
At this point, you just need to log in to each computer with the corresponding account and reboot. The next time Windows boots, it will automatically log in to the configured account.
No comments to display
No comments to display